To start the wizard for inventorying SNMP systems, click the Network Scan or SNMP button on the Inventory ribbon. The SNMP step will be displayed after you have selected a company and a domain (see: Basic Steps).
Scanning SNMP systems
For SNMP systems v1, v2 and v3 you can be determine whether the data of the SNMP systems, the topology, or both should be inventoried. If not all the data is needed, the duration of the SNMP Inventory can be shortened by this selection.
|
By checking the checkbox Reduce Inventory to Minimal Amount of Data, the number of inventoried MIBs is reduced. Only the basic data is inventoried. Imported custom MIBs, are also ignored in this setting. It depends on the devices and the number of custom MIBs, whether the inventory is taking less time with this settings. |

If the firewall is alerted due to too many pings during the search of the IP range, the number of parallel pings can be limited during the search.
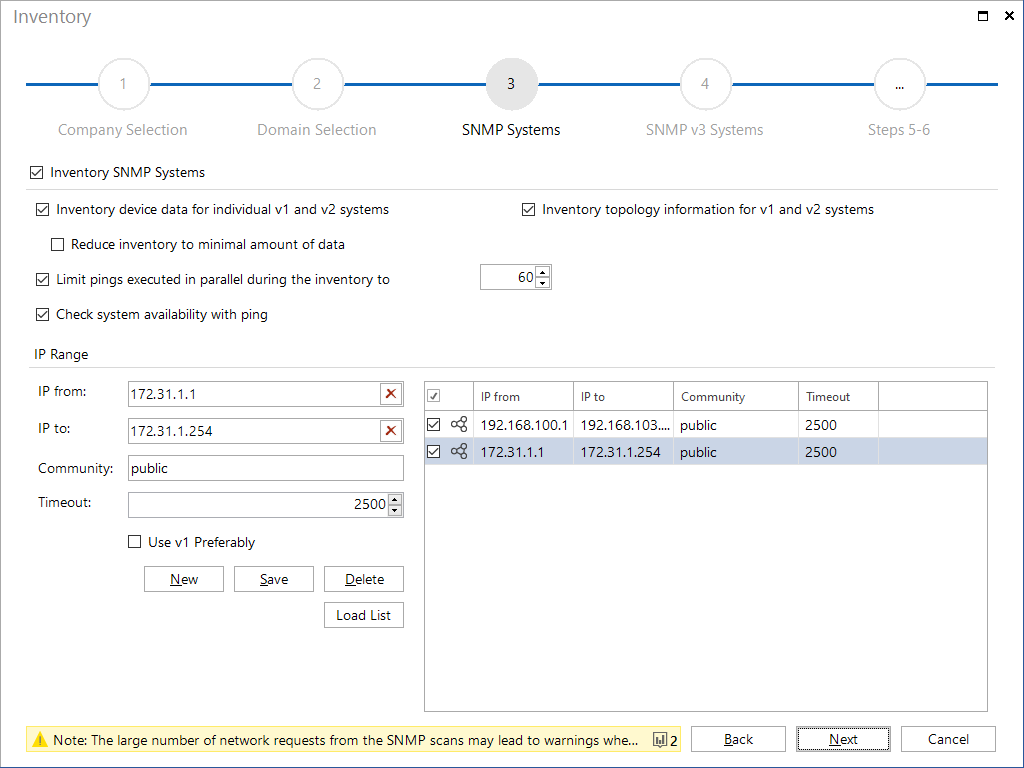
Fill in the IP from, IP to, Community and Timeout fields to define the IP range to be scanned. After you have added the desired ranges to the IP Ranges list, you can specify for each range whether or not the inventory scan should be performed by enabling / disabling the checkbox next to it.
If multiple IP ranges should be included in the inventory, they can also be imported from a CSV file by clicking the Load List button, instead of creating them individually using the buttons New and Save. In the CSV file the values for IP from, IP to, Community and Timeout must be listed in that order separated by ";". If a line doesn't match this format, this one will be omitted.
In SNMP inventory, Docusnap attempts to obtain data from the SNMP device through the v2 protocol. If this request does not work, a new request is started over the v1 protocol. For some SNMP devices, a request via the v2 protocol may cause the device to be unavailable for a few seconds via SNMP. In this case, you can choose to run the v1 protocol first. If a device can not be inventoried correctly, it is possible that the required data can be successfully collected by activating the Use v1 Preferably checkbox.
Scanning Systems using the SNMP v3 Protocol
The next step refers to scanning systems that support SNMP v3. The main difference between SNMP V3 and SNMP v1 / v2 is that, for SNMP v3 systems, you can define authentication data.
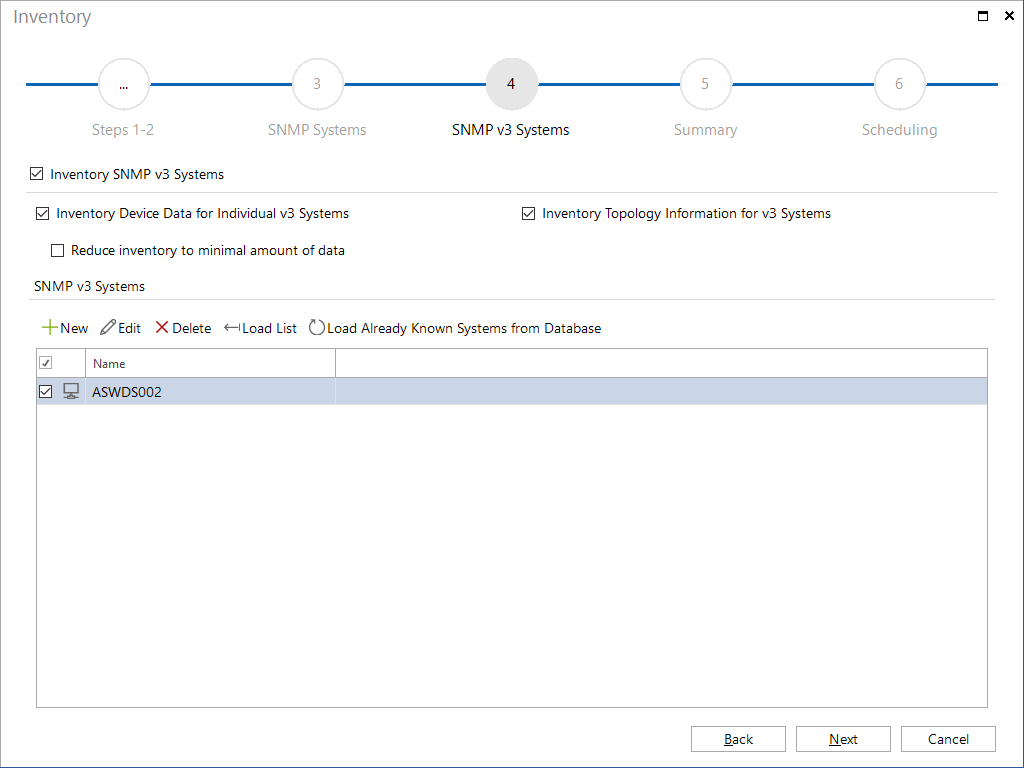
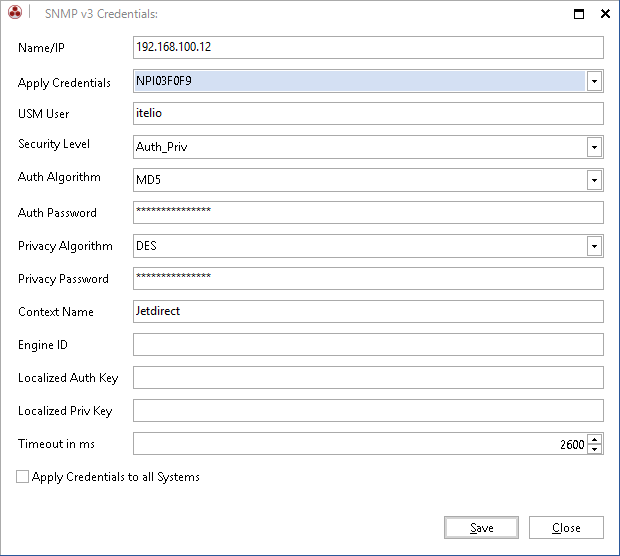
Clicking the New button opens the SNMP v3 Credentials dialog to specify the desired system Āthat uses SNMP v3 protocol. The authentication details are entered in this dialog to ensure a successful inventory.
Click the New button to specify the name of the desired system that uses the SNMP v3 protocol. When you click the Information button, the SNMP v3 Information dialog opens where you can enter the authentication details required for a successful scan. If the same credentials have already been saved for another system, they can be loaded for the current system by selecting them in the Apply Credentials combo box instead of having to be reentered.
By checking the Apply Credentials to all Systems checkbox, the current credentials will be used for all specified systems and must not be redefined for each device.
Clicking the Edit button opens the SNMP v3 Credentials dialog for the selected system and the credentials can be edited.
If several v3 systems should be inventoried, they can also be imported from a CSV file. The file can be selected by clicking the Load List button. In the CSV file, the values must be specified in the following order Āseparated by ";": System Name oder Address; USM User; Auth Algorithm; Auth Password; Privacy Algorithm; Privacy Password; Context Name;Timeout
If the other v3 systems have the same credentials, only the system name or the IP address must be specified. If new credentials are entered, they are used for all the corresponding subsequent entries.
Example for CSV file
ASWIT0001;Docusnap;SHA;secret;DES;secret;context;2600
192.168.100.3
192.168.100.4
192.168.100.5
The credentials are saved in the wizard. The wizard saves the devices of the last inventory so that they will be available the next time the wizard is opened. By clicking the Synchronize Credentials with Database button SNMPv3 systems including their credentials can be reloaded. This eliminates the need to reenter devices that have already been inventoried with another wizard or that have been deleted from the wizard.
After the desired systems have been added, you can use the checkbox next to each system to specify whether it is to be included in the inventory scan or not.
|
Generally, Docusnap uses the SNMP v1 and v2 protocols to identify SNMP systems. Each IP address in the specified range will be checked to determine if an SNMP system is involved. If the requested IP address responds to a ping and proves itself to be a valid SNMP system, the inventory process will be performed using the SNMP protocol. SNMP systems that require the SNMP v3 protocol, but have been listed in the IP range list for the normal SNMP scan (i.e. using the v1 and v2 protocols), will not be considered when scanning the v1 and v2 systems. |
By default, Docusnap inventories SNMP systems based on their system names. If a network includes multiple SNMP systems with the same system name, the results for all corresponding systems will be grouped under this system name. If you want to obtain individual results for each of these systems, you can specify to identify SNMP systems by their DNS names (on the Inventory page of the Options - Inventory dialog).
The large number of network requests from the SNMP scans may lead to warnings when using safety and monitor solutions.
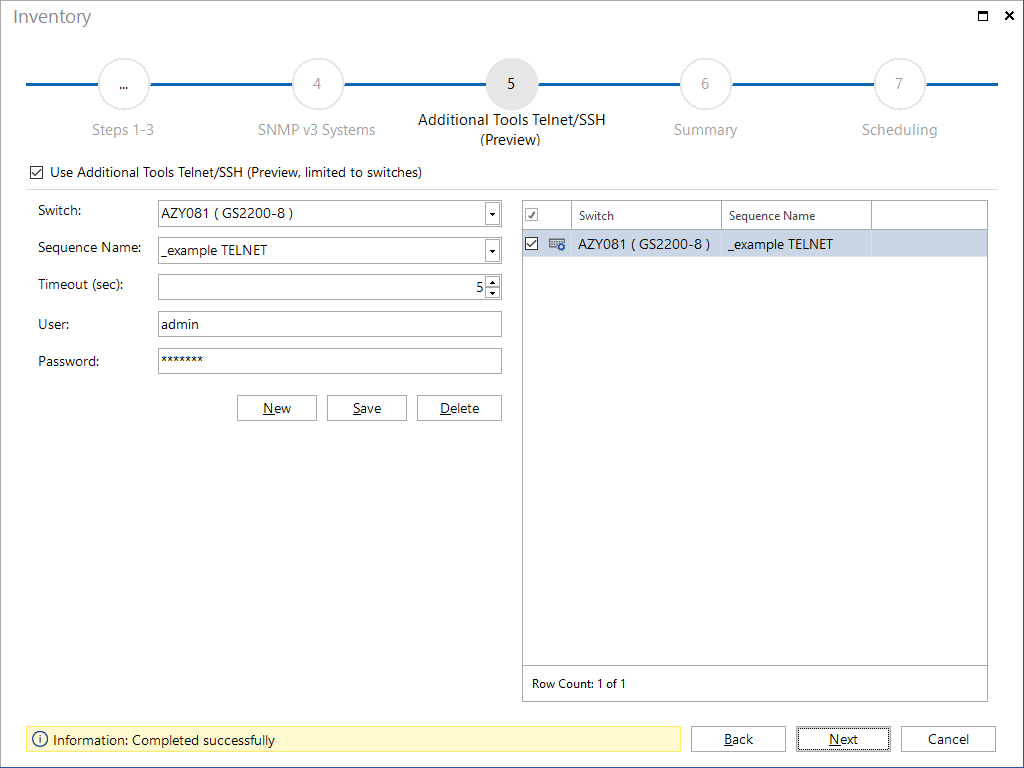
Additional Tools Telnet/SSH (Preview)
Basically, this function is similar to the Additional Tools already available in Docusnap, which optionally executes commands on the target system during the Windows inventory and then saves the execution results in Docusnap. Additional Tools Telnet/SSH provides this feature for the SNMP inventory, but uses the Telnet or SSH protocols for data retrieval. Data retrieval via this function is currently only possible for SNMP devices of type Switch.
To use this feature in SNMP inventory, it must be enabled in the Options - Inventory dialog in the Show Features section of the wizard by selecting the Telnet/SSH (Preview) additional programs option.
This optional inventory step allows to select previously inventoried switches and to query additional information with an appropriate command sequence.
The timeout value defines how long Docusnap waits for a response from the SNMP device before stopping execution with timeout error. Furthermore, the user and password for the switch query must be entered. The user entered here must have the appropriate rights. For example, with HP switches it would be possible to log on to the switch as "operator". This user is not authorized to read out the switch configuration. For this the user "admin" is needed.The steps described here need to be configured for each device. So if ten identical switches are to be read out, each of these switches must be selected and assigned.
Docusnap provides two simple templates for command sequences. Here, a configuration query is created on a switch (without manufacturer reference). The example is available for calling via Telnet and via SSH.
Other command sequences can be created by the user in the Docusnap Management.