The Job Management feature in Docusnap provides advanced management options for your jobs. Click the Scheduled Jobs button in the Scheduling ribbon, to open the dialog for organizing and editing jobs.
In the Job Management all jobs with the most important information are listed. If a user does not have permissions to a company, the orders of that company are not displayed.
The Delete and Add to the Queue buttons allow you to manage the configured tasks. You can abort an active job by clicking the  button. To delete a job from the database, select it and click the
  button. By clicking the
  button, the selected job is added to the queue and will be executed as soon as the Docusnap Server or the DDS can process the job.
Click on the Summary button to open a dialog showing the results of the job. For the failed and incomplete subtasks, the error messages or justifications are displayed in the Information column. The button is only active if the job has been executed at least once.
The status of the job can be determined by the used icon. Jobs with the icon  have been scheduled and will start at the next scheduled execution date. The jobs with the icon
  are currently executed. The jobs with this icon
  will no longer be executed. This is the case either if a job is excluded from the planning or because the job is not to be executed recurringly and the date of the one-time execution is already in the past.
The following options can be set by clicking on the button for the respective job.
- Edit Job: When you click the Edit Job button, the scheduled job will be opened in its associated wizard where you can edit it.
- Exclude from Schedule and Schedule Job Again: A click on the Exclude from Schedule button specifies that the job will no longer be executed. If the job should be included in schedule again, it can be reactivated by clicking the Schedule Job Again button.
- Job Details: By clicking on the Job Details button, the basic job and configuration data are displayed in a dialog.
- During the execution of the job, the current progress can be checked by clicking on the Job Status button.
|
Jobs can only be scheduled for the server discovery or a discovery service. Therefore the client discovery is not listed in the wizard, when the job is opened with the Edit button. The server discovery or another discovery service can be selected |


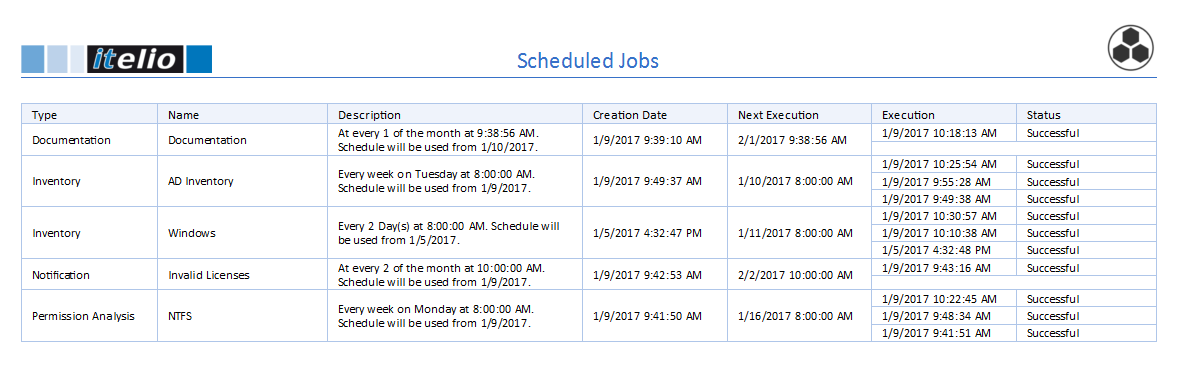
Report Scheduled Jobs
In addition to the overview in the Job Management dialog, a list of all jobs are generated in the Scheduled Jobs report below the Overview - Reports in the Inventory tree. This report lists the most important data for the Jobs.